This is a bash script for automating uploads to an Amazon Glacier vault. It is intended for use on the Raspberry Pi (tested on Raspbian Jessie on the Pi2). It implements multi-part uploading with hashes for each individual chunk, and error-recovery.
Disclaimer: This is a work-in-progress, and a fun project for me; I'm still testing it with non-critical files. Use it at your own risk. Glacier retrieval pricing is complicated, read about it before you start.
Downloads and Changelog
Table of Contents
Why
For fun. I've been out of touch with programming for a while now, but the Raspberry Pi sucked me back in. This is a perfect low-power system for off-site backups; you can leave it running overnight; a Pi 2 consumes at most 4W, compared to my i7 4770k that idles at 80W without a graphics card.
There are other tools (glacier-cli, mt-aws-glacier) that offer more full-fledged functionality (I haven't used them), but I wrote this for a specific purpose - unattended uploads of large archive files, my audio projects, that I can later manage with FastGlacier. To that end, it includes e-mail notification and a tiny web-server for monitoring status.
Features
- Automates all the grunt work (talking to servers, initializing upload, splitting file, creating hashes, etc.). All you need to do is run
./upload-glacier <filename> - Error-recovery: each chunk is hashed and verified by the Glacier server. It also maintains a log of failed chunks so you can recover a failed upload later (within 24 hours).
- Meant to be run unattended. Along with error-logging and recovery, it also sends an e-mail after completion with a detailed report.
- Allows remote monitoring via a simple web-server that implements IP whitelisting.
- FastGlacier-compatible metadata
Before Setup
Before starting, check for these dependencies:
- Python version is 2.7.9:
python -V- Install netaddr for Python:
pip install netaddr - Install psutil for Python:
sudo apt-get install gcc python-dev; pip install psutil - Install AWS CLI:
sudo pip install awscli
- Install netaddr for Python:
- Install recode:
sudo apt-get install recode - Set up a way to send e-mail. Alternately, disable e-mail by setting
do_email=0in the configuration file (see setup instructions).
Configure AWS
Skip this section if you already have aws setup and working with full Glacier access.
Create a vault and IAM user:
- Open the Glacier console. Choose an appropriate server location from the top-right drop-down menu, and note this location.
- Create a vault and note the name down.
- Open the IAM console. Under 'Users', create a new-user. Note down the access-key-id and secret-access-key.
- Click the user you created, and under 'Permissions', Attach Policy named AmazonGlacierFullAccess.
Run aws configure and enter the user access-id, secret-key, and region you created the vault in. If you're unsure, check this list of Glacier region-codes.
Download and Setup
Download the archive from here and extract the files into your home directory. Also grab calc-sha256-treehash and copy it into .upload-glacier/.
You should now have 3 files:
- upload-glacier
- .upload-glacier/calc-sha256-treehash
- .upload-glacier/ug-stat-srv.py
Make sure they're all executable. If you prefer, move upload-glacier to /usr/local/bin (don't forget to change permissions with sudo chown pi:pi <file> if you do this).
Configuration
Run upload-glacier -G to generate a config file for you. You'll need to provide full paths to the files above. At the end, it'll run an environment check. If you get no errors or warnings, you're good to go.
To configure the status-server, edit .upload-glacier/ug-stat-srv.py. You may want to modify the whitelist (CIDR format).
The configuration file is stored at ~/.upload-glacier/settings.conf, if you want to edit it yourself.
Usage
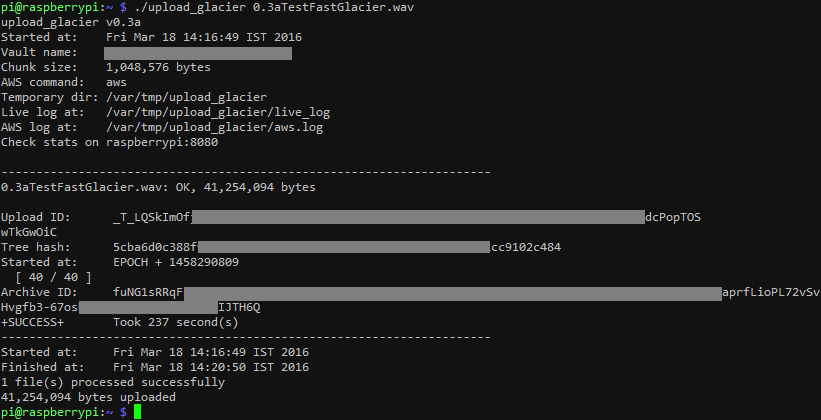
Run upload-glacier without any arguments to display usage information. Basic usage is (from the directory it's placed in):
./upload-glacier filename [filename2] [...]
Point your web-browser to <raspberrypi_IP>:8080 to see live status. The page will refresh every 5 seconds. Large files may take a while to split, so don't panic if it's 'Preparing files...' for a long time.
If you want it to continue running even when you logout (of course you do), use nohup or screen:
nohup ./upload-glacier filename &
# -or-
screen -dmS ug ./upload-glacier filename
screen -r ug # to view
If one or more chunks fail, you can start recovery mode with:
./upload-glacier -r
Running off a USB drive
If you're uploading large files, it should be better to use a temporary directory on that drive to avoid unnecessary write-cycles on your Pi's SD card. Mount the drive as the user and run upload-glacier with the -t option.
mount -o uid=pi,gid=pi /dev/sda1 /mnt/usb
upload-glacier -t /mnt/usb/ug-tmp file1 file2